If you have a hard drive or flash drive with FAT-32 file system and want to change it to NTFS, because FAT32 is an old technology for file system which does not support large files (over 4GB), but you do not want to loose your precious data then this article is for you as it explains how you can convert FAT 32 to NTFS seamlessly without data loss.
Why convert?
If you want to save a movie with 5 GB on your FAT 32 hard disk-based file system, what would you do? Do you like to keep it separate? Obviously not, this is too painful. In such case, you might feel that NTFS is a good assistant because of its features and benefits. This requires the conversion of FAT32 to NTFS.
FAT 32 and NTFS are two different types of file systems. NTFS is the "New Technology File System" created by Microsoft in 1993 which is more secure, stable, require lesser defragmentation time and it supports large files as well. Despite of that we end up using FAT32 because that is what most disks are pre-formatted with. Unless, we got the “Not enough disk space error” while trying to save larger files despite the disk space being available, we don't bother to change the file system. Most of us don't change it because of the risk of losing important data, lack of knowledge or lack of time (read laziness). As Microsoft was aware of this scenario, they provide a feature in the command prompt to overcome this by executing a simple command. There are many third party softwares that supports this too but the "convert" command is one of the easiest ways to do so. Follow the steps below to know how:-
How to convert FAT 32 to NTFS?
Method 1: Using Command Prompt
Important: While this method works perfectly, I would still advise you to backup your data in case anything goes wrong.
- Go to Computer, and note down the name of the drive whose file system you wish to convert.
- Open Command prompt in admin mode. For that search "cmd" on start menu and right click on command prompt and click on "Run as Administrator"
- Execute "chkdsk e: /f " (without quotes) where 'e' is the letter of the drive to you want to convert. This checks the drive for errors and fixes them automatically.
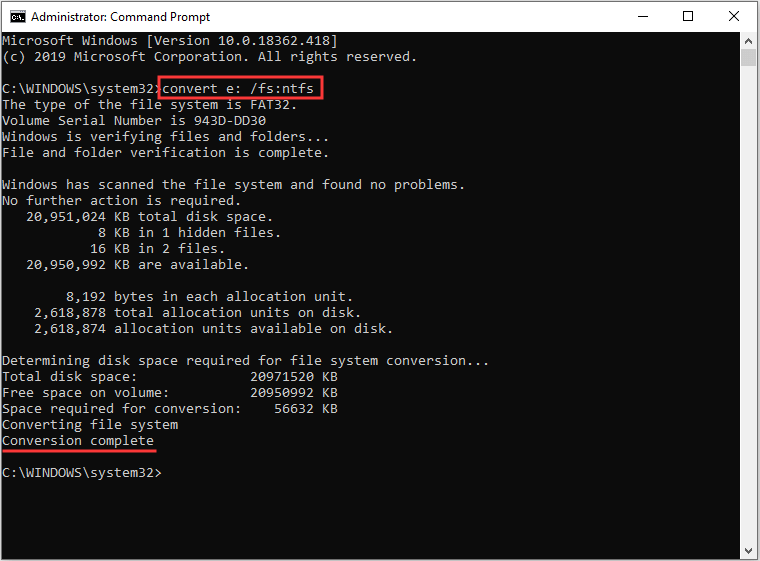
- Execute "convert E: /FS:NTFS" (without quotes). E is again the letter of the drive to be converted.
- Follow to prompt to enter current volume label for your drive E. Press Enter and the E drive will be formatted and changed to NTFS.
- The command prompt will start the conversion process and after a few minutes, Command prompt will say that conversion was successful.
- You can check it in the properties of the drive through right click > Properties.
Method 2: Using third-party softwares
I've listed here some "good" softwares out there for disk management. You can do much more with those softwares. I recommend you to try one of these.

Comments
Post a Comment